
Posted on — Leave a comment

Seed Starting- Simply

seed starting

The excitement is near! The large push for indoor seed starting has arrived. What a wonderful time of year of planning, designing, creating and sowing.

Let us share some simple and easy ways to make your seed starting a success. We have started seeds in every way possible so let us share our experience and knowledge. Our seed starting classes offer even more in depth information to make your garden dreams come true.

There are many ways to arrive at the same goal- we honor expertise of all kinds.

First: Materials

What type of container will you use? There are many options available…using what you have on hand makes seed starting cost effective and accessible for all. Drainage is the most important aspect here. Trays, cell packs, soil blocking, recycled yogurt containers (the possibilities are endless). Drainage is the key!

What medium are you going to use? We are a long way away from outdoor transplanting where plants can mine the nutrients, fertility and water needs naturally. You must supply all of these needs for the next roughly three months. Choosing a growing medium that is sterile will require the addition of fertility. Growing mediums that have fertility built in may still require additional nutritional needs. Purchase what you can afford and support local. Make sure that the medium you choose offers a guarantee as many growing substrates can harbor unwanted living materials…also keep your receipt.

What is the light source? Plants must have light…where is the supplemental light coming from? A window? Grow lights? There are so many options to choose from. For years we used good old fashioned T5’s purchased locally. If you are using a window, you may need to turn your trays several times per day. Determine how much time, effort and energy you have to dedicate and then decipher your light source.

Second: Location: Providing a micro climate for your seedlings to thrive! Seeds needs the right conditions to germinate: moisture, temperature, light (for some) and proper seed planting depth. A “warm” location with air movement is ideal. Where within your home can you place your seed tray away from cats, pets, kids and spouses? Scope out the ideal location that offers protection and the proper amount of air circulation.

Third: Days to maturation: Starting the right seeds at the right time… plants should be transplanted at a specific size that is not too big nor at critical points of growth if this can be avoided (flowering and fruit set). Certain plants grow VERY slowly depending on their type. A quick example: Certain Brussel Sprouts require 180+ days to grow. This seed would need to be started indoors in the darkest days of winter for a fall harvest. On the other hand, some cucumbers finish their lifecycle in 60-70 days and grow very quickly. If we started cucumber seeds for our garden now, the plants would be too large for indoor growing and would be transplanted during a critical point of growth. Cucumbers are a seed started closer to our target transplant date. Look at the days to maturation, plus the days to germination, plus some time for plants to adapt to transplant shock: that is your goal seed starting date.

Fourth: Depth Seed depth is critical for success. Think of how plants disperse their seeds naturally…many lay on top of the soil until the conditions are just right for germinating. Others pass through the digestive system of animals and spend their time in dung waiting for the optimal time. Seeds know what to do! Give them their best chance of success by planting them at the proper depths. Unless you are growing VERY large seeds, most seeds should be planted at 1/8″, 1/4″ and 1/2″ and some just lightly pressed into the soil (the smaller the seed, the more shallow the planting). If you plant too shallow the seed cannot use the depth to remove its hull and could break. If you plant to deep the tiny seed doesn’t have the energy to push through that much depth. When in doubt 2x the height of the seed is a good measure. Certainly seeds have to have light for germination…your seed packet should outline this clearly.

Fifth: Needs: Indoor growing requires all the input to be placed on the grower. The food, water, shelter and air must be supplied by us. Feeding seedlings and transplants is a part of this! We use granular or liquid amendments that have a low scent, a mild amount of fertility and are “natural” in nature. Making your own countertop composts (stay tuned for that growing guide) is another simple solution.

Happy growing!

Alaska sown-Alaska grown
Posted on — Leave a comment

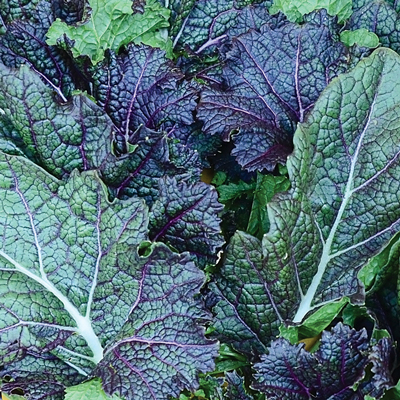
Spotlight on seed: Giant Red Mustard

Mustard Seed

Giant Red Mustard is a staple green in our kitchen. This is my husbands favorite leafy green by far!

Perfect for companion planting with slow growing vegetables or flowers, mustard is a true “cut and come again”. Harvest individual leaves for sandwiches, salads or a stir fry. The large leaves can be used as wraps for a low carb and gluten free bread replacement.

Mustard is excellent combined with sweeter greens in “wilted” salads and perfect for some flavor in smoothies.

This variety is very cold hardy and withstands frosts with ease. Mustard is perfect for shade gardens and those that are a bit cooler.

Fall in love with flavor with an old fashioned green.

Shop now: https://seedsandsoilorganics.com/product/mustard-giant-red-brassica-juncea-var-integrifolia/

Alaska sown-Alaska grown

Posted on — Leave a comment

Safe Seed Pledge

Here is our pledge:

SAFE SEED PLEDGE

“Agriculture and seeds provide the basis upon which our lives depend.  We must protect this foundation as a safe and genetically stable source for future generations.  For the benefit of all farmers, gardeners, and consumers who want an alternative, we pledge that we do not knowingly buy or sell genetically engineered seeds or plants.  The mechanical transfer of genetic material outside of natural methods and between genera, families or kingdoms, poses great biological risks as well as economic, political, and cultural threats…”

All of the links to sign the pledge, research the pledge or contact the Council for Responsible Genetics are no longer viable.

Posted on — Leave a comment

What zone are you in? Above frozen ground..

The USDA has a tool that outlines annual extremes for minimum temperature across 13 areas of the U.S.

An example of a zone represented in Southcentral Alaska is zone 4.

The USDA map has minimum temperatures of -30F to -20F for zone 4.

We can use this zone tool to help guide us when adding perennials (plants that live more than two years) and biennials (plants that complete their lifecycle in two years) to our garden spaces.

If I am shopping and find a “zone 7” plant , I may be able to grow this plant as an annual but the rate of overwinter survival will be less as the minimum temperature for a “zone 7” plant is 0F to 10F and the minimum temperatures in zone 4 may be way too cold for this plants survival without certain extreme protection measures.

When we are discussing annual plants (those plants that complete their life cycle in one year) we need know our frost free dates. This is the span of time where we can reasonably expect not to have killing frosts (28F and below).

For my landscape and microclimate growing spaces this is from May 1 (ish) – Sept 30 (ish). As nature doesn’t always fit in the “box” we can expect seasons to extend and sometimes shorten.

Nature is dynamic…not static

Certain plants can withstand much colder temperatures and overwintering with meticulous care of the soil, the enhancement of natural microclimates and a keen understanding of individual plant species coupled with extensive season extension. Taking growing risks is a fun garden challenge I look forward to every year.

We can use these tools as a guide to direct us towards plant choices and landscape design. Check your zone for perennials and biennials and know your frost free dates for annuals.

Here is a link for the USDA hardiness zones: https://plants.usda.gov/hardiness.html

Here is a link for frost free dates: https://www.almanac.com/gardening/frostdates

Posted on — Leave a comment

“Plant a row” for wildlife

During the growing season life is abundant across our landscape. Birds, bees, moose, ermines, foxes, voles and insects of all kinds can be found shacking up or passing through for hydration and nutrition.

Once we stopped removing all the plant material at the end of the growing season, it allowed the living roots from the harvested crop to finished their legacy and exchanges within the soil economy. This process vastly improved our soil but it also provided the necessities for life to return to the land…even in winter.

There is as much life on our landscape during the days governed by King Winter as there is in the days engrossed in the midnight sun. With the exception of the warm weather insects we still have life here- in the bitter cold.

Plant a row for wildlife this coming season. Design a space where flowers are allowed to go to seed so that our friends of the air can sustain. Allow the spent plant material of the harvest to give shelter to those that need a little more protection. The amount of joy that this has brought to my heart during the winter months is immeasurable. I hope that these small actions will bring you some happiness as well.