Posted on Leave a comment

Alaska Seed Season

Alaska Seed Season

Wow- another year of growing seed in the Great-land. I will say that this year was unique and very challenging for me. This post may be upsetting to some as I will discuss grief and some tragic events that took place this year.

Alaska Seed Season

My bonus Mom (Step Mom) passed in Feb. In December of 2024, she had had a heart valve replacement. This was something she has done about 10 years prior and would have to have another one in about 10 years. Advances have been made since the last surgery and they can now replace the valve through the groin. Unfortunately, her surgical team convinced her to have open heart surgery (she was so afraid of this as she knew how hard it was to heal from the last one) so they could widen the space to prepare for her surgery when she was 76 (she passed at 66).

The surgery actually went relatively well and overall she felt better than her initial. Unfortunately that would last. Within a week, she felt her chest heavy, tired and instantly had a cough. This persisted for 45 days until her death. She saw 10 different medical professionals over 15 appointments. 3 days before she died she went to her cardiologist who did an Xray. They said she had pneumonia. She walked into the emergency room but sadly died 3 days later.

The valve, her heart and lungs were covered in aspergillus fungus- it had spread from the valve into the heart and finally into the lungs. The constant coughing was a sign and the once test the could have saved her life was schedule for the morning of her death.

I will spare further details but this has been devasting for my Dad and my family. My Dad is nearly lost in life now and is frozen in grief. My heart just aches.

In August, I played in the Alaska State Amateur Golf Tournament. It was the first tournament I had played in… I was a bucket of nerves. The second day of a three day tournament I received a call that my friend Riki had passed tragically. Riki worked full time as a meat processing manager but helped her brother combine on the weekends (her brother has about 6,000 acres). On that Saturday morning, Riki’s combine caught an underground wire. When she stepped down from the cab to solve the issue, she was electrocuted. To make the situation even more heart breaking, her 22 year old sons best friend has just joined the volunteer fire department. Riki was like a second mother to him. His first call was Riki’s death.

Sometimes I feel like I am being swallowed by sadness and I can’t escape the pain. This season I didn’t really have it in me… farming by hand is tiring and I am no Spring chicken. Not even the annual failures phased me. It was as if I was walking through the growing spaces detached from the normal emotional connection I have with the plants and soil. I was so consumed with helping my Dad and trying to find answers as to why these beautiful women lost their lives so shockingly, that I became a robot going through the motions.

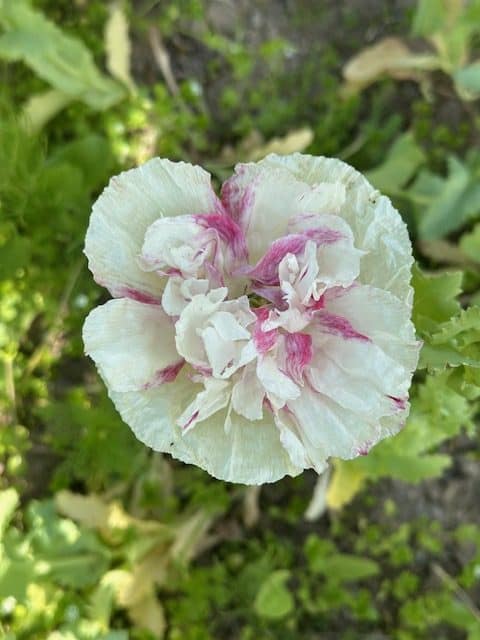
As for our seed harvest- I focused mostly on increasing our stock in spinach, mizuna, lettuce, wildflowers and calendula. We do have some great new tomatoes, a beautiful new heirloom poppy, and of course quinoa seed.

I can say that I did not try my best this year. I never realized my heart could ache so deeply.

This tiny little seed farm still brings me joy albeit less than previous seasons. We have some changes coming for next year- for the seed that does not sell well, we will no longer be offering it. It saddens me because some of them are my favorites but seed saving is a lot of work and I will have to focus on seeds that produce income. As many of you are aware, my husband has an off farm full time job and helps me at night and on the weekends.

Thank you again for your support. It means a lot to me.

Jennifer

Posted on Leave a comment

Alaska Garlic FAQ: Cold Climate Growing Tips from a Local Farmer

Alaska Garlic FAQ: Cold Climate Growing Tips from a Local Farmer

Growing garlic in Alaska comes with its own set of rules, rhythms, and surprises. I’ve been planting, mulching, feeding, and harvesting garlic here for years and I get a lot of questions from other gardeners trying to make it work in our unique climate. Here are some of the most common questions I hear along with real answers based on my experience growing garlic in the far North.

Alaska Garlic FAQ

Q: When do you plant garlic in Alaska?
A: I usually plant the last week of September, but I’ve gone as late as mid-October when fall runs long. The key is getting it in once the soil cools down but before the ground freezes. You want it to root in, not sprout.


Q: What garlic varieties grow best here?
A: Hardneck types are what thrive in our climate. I’ve had the most success with Music, German Extra Hardy, Northern White and Chesnok Red. They can handle our deep freezes and still give nice, bulbs by August.


Q: Do you mulch your garlic?
A: Always. I use straw, leaves, or even shredded paper if I’m in a pinch. Without mulch, the freeze-thaw cycle can push the cloves up out of the soil or dry them out. I aim for about 4–6 inches, then I pull it back in spring once the snow’s gone. We plant our garlic slightly deeper in Alaska. 


Q: When do garlic scapes show up in Alaska?
A: For me, it’s usually the second or third week of July. If it’s been a warm spring, they’ll show up a little sooner. Once I see that curl in the stem, I cut them right away to help the plant focus on bulb growth. Be sure not to clip any leaves as they are needed for the transition to bulb production. 


Q: How do you know when to harvest garlic?
A: I wait until the bottom 3–4 leaves turn yellow and start to dry out, but the top leaves are still green. That’s usually around the third week of August. Too early and the bulbs are small; too late and the wrappers split. 


Q: Can garlic survive our winters without protection?
A: I’ve had a few stray cloves overwinter without mulch, but they’re usually smaller and slower to come up. If I want a reliable crop, I mulch and make sure they’re planted at least 3–4 inches deep. Alaska winters aren’t the place to cut corners. 


Q: Do you fertilize your garlic?
A: Yes, and it makes a huge difference. I feed with nitrogen-heavy fertilizer in early spring as soon as the shoots pop up, then switch to something lower in nitrogen around June to support bulb production. Organic fish emulsion or blood meal early on, then I taper it off.

Shop fall planted garlic seed here: https://seedsandsoilorganics.com/product/alaska-garlic-1-pound/

Take a garlic class in person: https://seedsandsoilorganics.com/product/this-event-is-full-alaska-garlic-class-garlic-heads-included-in-person-september-20th-at-1pm-copy/

Or online: https://seedsandsoilorganics.com/product/alaska-garlic-class-garlic-heads-included/

Posted on Leave a comment

Growing Tomatoes in Alaska

Growing Tomatoes in Alaska

Tomatoes might be the most beloved crop in the home garden, and for good reason. Nothing in the grocery store comes close to the flavor of a homegrown tomato picked at peak ripeness. Yet growing tomatoes, especially in northern climates like Alaska, is a different game altogether. It requires attention to detail, thoughtful planning, and a solid understanding of what tomatoes need to thrive in our cool climate.

Growing Tomatoes in Alaska

Where it All Began

Tomatoes have been part of human cultivation for a staggering 80,000 years, originally wild plants native to Western South America. Over time, they’ve developed into the 10,000+ named varieties we see today: from tiny cherry tomatoes to sprawling beefsteaks. They belong to the nightshade family, alongside peppers, potatoes, eggplant, and tomatillos, all of which share a common trait: the presence of naturally occurring compounds like solanine. While harmless in ripe tomato fruit, solanine is present throughout the leaves and stems of the plant, reminding us that tomatoes are wild at heart.

Taming a Wild Species

Growing great tomatoes always starts with location. Tomatoes are heat-loving plants that demand sunlight and warmth. In northern regions, that often means creating a microclimate specifically for them.

Choose the sunniest, driest, most protected spot in your landscape. Tomatoes require a minimum of six to eight hours of direct sunlight per day. Ideal temperatures hover around 75°F during the day and 55°F at night. That can be pretty challenging for most areas of Alaska- creativity is paramount in growing tomatoes here.

Beyond heat, air flow and bottom watering matter just as much. Tomatoes thrive in dry, well-ventilated spaces where air can move freely through the leaves. It shouldn’t feel windy, but the air should never feel stagnant either. This is why overhead watering is discouraged: wet leaves and poor air flow are an invitation for disease.

Growing Tomatoes in Alaska

Why Prune?

Pruning tomatoes is a practice that many gardeners shy away from, but it makes a world of difference, especially for indeterminate varieties (more on this in a bit). Pruning increases air flow, reduces splash back from watering, helps leaves dry faster, and minimizes the risk of soil-borne diseases. It also focuses the plant’s energy on fruit production rather than excessive leaf growth.

Use clean, sharp shears. Start pruning when your plant is about two feet tall by removing the lower leaves and any early flowers. Later, you’ll want to remove “suckers” which are those small shoots that emerge where the leaf stem meets the main stem. In those areas with a much longer growing season, suckers can be rooted to create plant clones.

About thirty days before your first expected frost (right before the fair) I “top” my tomato plants by cutting off the growing tip to redirect all remaining energy into ripening the last fruits. I also restrict water to assist in vine ripening.

Determinate vs. Indeterminate: Know the Difference

Tomatoes are divided by growth habit, and this distinction changes everything about how you manage them.

Determinate tomatoes are compact, bush-like plants, typically reaching three to four feet tall. They produce their fruit during a specific window and have a set number of fruit (determined amount of fruit production) before perishing.

Determinate tomatoes do not require pruning (with the exception of the first foot and they do well in cages).

Indeterminate tomatoes are the vining type growing anywhere from six to twenty feet long and will continue producing fruit until frost kills the plant (undetermined amount of fruit production). These tomatoes need sturdy support and benefit from regular pruning to direct their energy into producing fruit rather than foliage.

Watering: The Art of Consistency

Tomatoes don’t like surprises, especially when it comes to water. Inconsistent watering is one of the leading causes of fruit cracking and weakened plants which welcome both pests and disease.

Tomatoes need about one inch of water per week (a little more than half a gallon), delivered deeply and less frequently rather than shallow, daily sprinkles. Drip irrigation, timers, and even simple watering schedules written on a calendar can prevent common watering mistakes.

Containers, in particular, dry out faster than in-ground plants. A five-gallon minimum is recommended for each tomato plant grown in a container, with water applied every two to three days until it drains out the bottom.

Preventing Common Tomato Problems

Many tomato problems are environmental and preventable. Be sure your pruning equipment is clean and sanitized. I also suggest that pruning is done during the first part of your day when you too are clean and not contaminated by outdoor growing spaces.

Cracking comes from periods of drought followed by a sudden flush of water. Prevent this with consistent watering and mulching.

Blossom Drop happens when night temperatures stay above 70°F, or humidity is too high. Proper spacing, airflow, and reducing nitrogen inputs can help.

Blossom End Rot shows up as dark, mushy spots at the bottom of the fruit. Balanced soil, adequate calcium, and consistent moisture are key. I have found insufficient or improper pollination to be the main culprit of blossom end rot. Tomatoes are self pollinating, but the pollen may not flow freely at times preventing complete fertilization to occur.

Late Blight begins as brown to black spots on stems and leaves. Unlike some other diseases, the lesions aren’t contained by the leaf veins and can spread quickly.  Phytophthora infestans thrives in cool, wet conditions and is spread by airborne spores or infected plant material. To control it, remove infected parts immediately, avoid overhead watering, practice crop rotation and ensure thorough garden cleanup.

Powdery Mildew appears as a white coating on leaves. Keep air moving, avoid overhead watering, and prune regularly.

Leaf Curl is usually a stress response; too much pruning, heat, or nitrogen can trigger it.

Nutrient Deficiencies show up in leaf color changes purple (phosphorus), brown edges (potassium), or pale yellow (nitrogen). The fix is always to start with a well-balanced soil and amend as needed.

Starting Tomatoes from Seed

Tomatoes should always be started indoors in northern climates. They love warmth, steady conditions, and good fertility from the very beginning.

Choose a dedicated space that stays between 65°F and 75°F. Use seed-starting trays or four-inch pots, and fill them with a sterile or balanced growing mix. Water deeply before planting, label everything clearly, and use a heat mat to maintain steady warmth for germination.

Plant tomato seeds about a quarter-inch deep. Most will germinate within seven to ten days if the temperature is right.

Once seedlings have true leaves, begin fertilizing with a diluted liquid amendment or compost tea. When it’s time to transplant outdoors, do so only after the soil has warmed and nighttime temperatures stay reliably above 50°F.

A Few of My Favorite Varieties

For northern gardeners, I lean heavily on heirloom/ open pollinated and indeterminate types for their flavor and resilience.

Black Cherry: small fruits with huge flavor.

Green Tiger: beautiful, striped fruit perfect for snacking.

Black Krim: rich, deep flavor with striking color.

Moskvitch: slicer that handles cooler weather well.

For those interested in saving tomato seeds, open pollinated varieties are a great start for beginners. Tomatoes for seed saving require an additional 6-8 weeks on a living vine to ensure maturity. Immature seeds or those seeds harvested in the juvenile stage may have impacts on the genetics of future generations (susceptibility to disease, loss of desirable traits, smaller fruits, poor fruit quality, weak seedlings, lack of vigor, reduced genetic stability, shorter storage life and decreased germination).

Final Tips

Interplant your tomatoes with herbs like dill and flowers like marigolds or alyssum. These plants help with pest management, pollination, and soil health.

Tomatoes are by far the heaviest feeders in the annual Alaska garden. They should have a fertility schedule of a feed every two to three weeks. Prior to the appearance of flowers, a well rounded fertilizer can be used to promote leaf and root development.

Once the plant is mature enough to reproduce, tomato plant fertility should be steered towards flower and fruit production. For the home gardener who is purchasing their fertility program, I recommend fertilizers that are OMRI certified (Organic Materials Review Institute) made from materials considered regenerative if possible.

Tomatoes can suffer tissue damage when temperatures fall below 45F. For those times, cover your plants with sheets or use thermal mass to increase the temperature by a few degrees.

Although a vine ripened tomato is surely the reward of summer, tomatoes can be harvested at a “blush” when just a hint of color appears. They can finish fully ripening indoors.

Lastly, we can’t forget about all the green tomato recipes out there- unripened tomatoes can be a treat in themselves.

In the north, we don’t grow tomatoes by accident. We grow them with intention, preparation, and a whole lot of patience.

About the Author:

Jennifer Sharrock is a regenerative seed grower, educator, and founder of Seeds and Soil Farm in Palmer. She grows Alaska adapted flower, vegetable and herb seeds in Southcentral Alaska. Follow the the Alaska Seed journey on Instagram @seedsandsoilfarm and learn more at seedsandsoilorganics.com

Posted on Leave a comment

Gardener’s Guide for Southcentral Alaska

Gardener’s Guide for Southcentral Alaska

Every spring in Southcentral Alaska brings renewed anticipation to gardeners. After a long winter of snow and ice (barring a warm and dry odd winter), we eagerly await signs of thaw and the return of green life to our landscape. The excitement builds as seed packets and nursery catalogs arrive, filled with vibrant pictures and enticing plant descriptions.

Yet, before our dreams of lush perennial flowers, ripe perennial vegetables, and flourishing biennials materialize, we must first understand the climate in which we garden, and that’s where gardening zones become essential.

Gardener’s Guide for Southcentral Alaska

Understanding USDA Gardening Zones

The USDA Plant Hardiness Zone Map, developed by the United States Department of Agriculture, divides North America into gardening zones based on average annual minimum winter temperatures. It’s a valuable tool because it helps gardeners understand which plants are most likely to survive and thrive in their area.

Southcentral Alaska typically falls within zone 4, characterized by average minimum temperatures ranging from -30°F to -20°F. Knowing this helps gardeners choose plants that have the best chance of surviving our harsh winters without intensive protection methods.

Yet, within zone 4, significant smaller climate variations exist. Areas near bodies of water, sheltered valleys, or those at higher elevations can differ greatly, sometimes resembling zone 3 or even milder zone 5 conditions. For example, coastal areas influenced by the warming effects of nearby waters may experience milder winters, allowing gardeners there to successfully overwinter plants considered marginal elsewhere in zone 4. Conversely, exposed or elevated areas might regularly experience temperatures even colder than -30°F.

The Power of Microclimates

A microclimate refers to localized atmospheric conditions that differ from the surrounding area. Recognizing these variations is key to garden success. A sheltered south-facing slope, for instance, might capture warmth more effectively and allow gardeners to push the zone boundaries, successfully cultivating plants rated for a warmer zone. Likewise, low-lying areas that accumulate cold air or locations exposed to wind might require plants suitable for colder climates than their broader regional zone might suggest.

In my garden, I’ve discovered microclimates created by simple structures such as fences, buildings, or even large trees. Identifying these spots has allowed me to experiment and grow plants that technically shouldn’t survive my area’s typical conditions. We have several perennial herbs that come back year after year and are considered zone 6 or higher.

Recognizing and maximizing your garden’s microclimates opens a range of gardening possibilities and encourages creative experimentation.

Annuals, Biennials, and Perennials: Choosing Wisely

When we consider planting perennials (plants that live for more than two years) and biennials, which complete their lifecycle over two years, our zone information is indispensable. A perennial labeled for a warmer zone, say zone 7, might thrive as an annual here, but will almost certainly not survive our winters without significant protection.

Zone 7 plants are rated for minimum temperatures of 0°F to 10°F, meaning they are ill-prepared for our -20°F or colder Alaskan winter extremes. Gardeners attempting to keep these tender plants alive through winter must commit to protective measures like mulching, wrapping, heated greenhouses, or other intensive season-extending techniques.

Annual plants, those that complete their life cycle within one growing season are less impacted by zone temperatures and more sensitive to our frost-free growing dates.

In Southcentral Alaska, our frost-free period generally occurs from May 15th (give or take a few weeks) until around September 15th. Of course, nature rarely conforms exactly to the calendar; some years, spring arrives earlier, and sometimes autumn frosts surprise us sooner than anticipated.

While these dates offer a useful starting point, seasoned gardeners understand that observing natural clues—the swelling buds on birch trees, the arrival of migratory birds, or blooming native plants—often provides more accurate local signals for planting and transplanting.

The Art of Season Extension

Alaska gardeners frequently embrace the challenge of stretching their growing season beyond traditional expectations. Techniques such as raised garden beds, cold frames, hoop houses, high tunnels, greenhouses, and heavy mulching are invaluable tools to combat late or early frosts. Personally, I find immense satisfaction in pushing seasonal boundaries and experimenting with these methods.

For example, using simple hoops covered with frost cloth or plastic can shield tender seedlings and extend harvests well beyond our average frost dates. Likewise, raised beds help soil warm quicker in the spring, offering earlier planting opportunities and better drainage. Experimentation can be thrilling and, even when unsuccessful, always provides valuable learning experiences for future seasons.

Phenology: Nature’s Own Garden Calendar

While the USDA zone map and frost dates are helpful guidelines, nature herself often provides the most accurate planting indicators. Phenology, the study of cyclic and seasonal natural phenomena, is an invaluable tool for gardeners who prefer to synchronize their planting schedules with local natural cycles.

In my gardening experience, I’ve learned to watch closely for phenological clues. When the birch tree buds burst open or when local flowering trees bloom, I know conditions are right for transplanting seedlings outdoors. These natural signals often prove more accurate than dates on the calendar, adjusting naturally year-to-year with changing weather conditions.

We are currently emerging from an El Niño pattern, a phenomenon in which warmer ocean temperatures can influence Alaska’s weather. Such climate variations can potentially lead to earlier-than-normal spring warmth and an extended growing season. Observing nature’s own signals will allow us to capitalize on these potentially favorable conditions.

Gardening as a Journey of Learning and Adaptation

Gardening is inherently dynamic, not static. Our gardens change with each season, each plant responds differently, and our knowledge grows with every success and every setback.

As Alaskan gardeners, we’re invited to embrace experimentation, take calculated risks, and savor the anticipation each spring brings. By combining the information provided by zone maps, our understanding of microclimates, careful attention to frost dates, and phenological awareness, we set ourselves up for gardening success and, ultimately, deeper connections to the unique environment we call home.

About the Author:
Jennifer Sharrock is a regenerative seed grower, educator, and founder of Seeds and Soil Farm in Palmer. She grows Alaska adapted flower, vegetable and herb seeds in Southcentral Alaska. Follow the the Alaska Seed journey on Instagram @seedsandsoilfarm and learn more at seedsandsoilorganics.com

Posted on Leave a comment

Troubleshooting Common Issues When Starting Seeds Indoors

Troubleshooting Common Issues When Starting Seeds Indoors 
Starting seeds indoors can feel incredibly rewarding—it’s like giving spring a jump-start while winter’s still hanging around. But sometimes, your tiny seedlings might struggle, leaving you scratching your head, wondering where you went wrong. Don’t worry—you’re not alone! Let’s dive into five of the most common seed-starting problems and some easy ways to get back on track.
Troubleshooting Common Issues When Starting Seeds Indoors
1. Leggy Seedlings
Issue: Seedlings grow tall and thin, leaning towards your window or grow lights.
Cause: Not enough direct, strong light. Seedlings stretch toward available light, becoming leggy and weak.
Easy Fix:
  • Provide stronger or closer lighting. Seedlings ideally need 12–16 hours of bright, direct light daily.
  • Move grow lights closer, keeping them 2–4 inches above seedlings.
  • Rotate trays every day or two if using a sunny windowsill, helping plants grow straight and strong.
2. Mold and Fungus on Soil Surface
Issue: A fuzzy white or gray mold appears on the surface of your seed-starting mix.
Cause: Overwatering or poor airflow, creating perfect conditions for fungus growth.
Easy Fix:
  • Reduce watering frequency. Let the soil surface dry slightly between waterings.
  • Increase air circulation by adding a gentle fan nearby. A little breeze not only reduces mold but also strengthens seedlings.
  • Sprinkle cinnamon lightly over the soil surface—it’s natural and gently helps prevent mold growth.
3. Seeds Don’t Germinate or Germinate Unevenly
Issue: Seeds stay dormant, germinate slowly, or sprout inconsistently.
Cause: Often due to incorrect temperature, old seed, or planting too deep.
Easy Fix:
  • Check seed packet instructions for ideal germination temperature. Most veggie seeds germinate well between 65–80°F. Seedling heat mats work wonders here!
  • Use fresh seeds—older seeds may have reduced viability. If unsure, do a quick germination test with a damp paper towel before planting.
  • Plant seeds at recommended depths (usually twice the seed diameter), ensuring they’re not buried too deeply.
4. Wilting or Yellow Seedlings
Issue: Seedlings look droopy, yellow, or unhealthy despite watering.
Cause: Often caused by overwatering, compacted soil, or nutrient deficiency.
Easy Fix:
  • Allow the soil surface to dry out slightly between waterings to prevent waterlogging.
  • Gently loosen compacted soil by carefully poking holes in the mix using a pencil or wooden skewer.
  • Once seedlings develop their first true leaves, feed lightly with diluted organic liquid fertilizer to provide essential nutrients.
5. Seedlings Falling Over (Damping-Off)
Issue: Young seedlings suddenly wilt and collapse at soil level, seemingly overnight.
Cause: Damping-off disease, a fungal infection that thrives in wet, cool conditions with poor airflow.
Easy Fix:
  • Preventative action is key—always start seeds in sterile seed-starting mix and clean trays thoroughly before planting.
  • Water seedlings gently from the bottom (tray watering), avoiding overly wet conditions around delicate stems.
  • Improve airflow around seedlings, using a gentle fan as mentioned above.
Don’t Give Up!
Seed starting is a skill that improves with practice and patience. If things don’t go perfectly at first, don’t get discouraged—every experienced gardener has faced these common issues. With the solutions above, you’ll soon be growing happy, healthy seedlings ready to thrive outdoors.


About the Author:
Jennifer Sharrock is a regenerative seed grower, educator, and founder of Seeds and Soil Farm in Palmer. She grows Alaska adapted flower, vegetable and herb seeds in Southcentral Alaska. Follow the the Alaska Seed journey on Instagram.